- Section 1: Configure and Administer vSphere 6.x Security
Section 1: Configure and Administer vSphere 6.x Security
Section 1 of the VCP6-DCV blueprint
Objective 1.1: Configure and Administer Role-based Access Control
Compare and contrast propagated and explicit permission assignments
- An example of a propagated permission:
- Most inventory objects inherit permissions from a single parent object in the hierarchy. For example, a datastore inherits permissions from either its parent datastore folder or parent data center. Virtual machines inherit permissions from both the parent virtual machine folder and the parent host, cluster, or resource pool simultaneously.
- An example of an explicit permission:
- User1 is assigned Permission to only see and modify VM1
- An example of a propagated permission:
View/Sort/Export user and group lists
- You can view, sort, and export lists of a host’s local users to a file that is in HTML, XML, Microsoft Excel, or CSV format.
Add/Modify/Remove permissions for users and groups on vCenter Server inventory objects
- Add a Permission to an Inventory Object
- Browse to the object for which you want to assign permissions in the vSphere Web Client object navigator.
- Click the Manage tab and select Permissions.
- Click the Add icon, and click Add.
- Identify the user or group that will have the privileges defined by the selected role.
- From the Domain drop-down menu, select the domain where the user or group is located. Type a name in the Search box or select a name from the list.
- Select the user or group and click Add.
- Click OK.
- Select a role from the Assigned Role drop-down menu.
- (Optional) To limit propagation, deselect the Propagate to Child Objects check box.
- Click OK to add the permission.
- Change Permissions
- Browse to the object in the vSphere Web Client object navigator.
- Click the Manage tab and select Permissions.
- Click the line item to select the user or group and role pair.
- Click Change role on permission.
- Select a role for the user or group from the Assigned Role drop-down menu.
- To propagate the privileges to the children of the assigned inventory object, click the Propagate check box and click OK.
- Remove Permissions
- Browse to the object in the vSphere Web Client object navigator.
- Click the Manage tab and select Permissions.
- Click the appropriate line item to select the user or group and role pair.
- Click Remove permission.
- Add a Permission to an Inventory Object
Determine how permissions are applied and inherited in vCenter Server
- Global permissions are applied to a global root object that spans solutions, for example, both vCenter Server and vCenter Orchestrator. Use global permissions to give a user or group privileges for all objects in all object hierarchies.
Create/Clone/Edit vCenter Server Roles
- Create a Custom Role
- Log in to vCenter Server with the vSphere Web Client.
- Select Home, click Administration, and click Roles.
- Click the Create role action (+) button.
- Type a name for the new role.
- Select privileges for the role and click OK.
- Clone a Role
- Log in to vCenter Server with the vSphere Web Client.
- Select Home, click Administration, and click Roles.
- Select a role, and click the Clone role action icon.
- Type a name for the cloned role.
- Select or deselect privileges for the role and click OK.
- Edit a Role
- Log in to vCenter Server with the vSphere Web Client.
- Select Home, click Administration, and click Roles.
- Select a role and click the Edit role action button.
- Select or deselect privileges for the role and click OK.
- Create a Custom Role
Configure VMware Directory Service
- Select a host in the vSphere Client inventory, and click the Configuration tab.
- Under Software, click Authentication Services.
- Click Properties.
- In the User Directory Services dialog box, select the directory service from the drop-down menu.
- Enter a domain.
- Click Join Domain.
- Enter the user name and password of a directory service user who has permissions to join the host to the domain, and click OK.
- Click OK to close the Directory Services Configuration dialog box.
Apply a role to a User/Group and to an object or group of objects
- Identify the user or group that will have the privileges defined by the selected role.
- From the Domain drop-down menu, select the domain where the user or group is located.
- Type a name in the Search box or select a name from the list.
- Select the user or group and click Add.
- Click OK.
- Select a role from the Assigned Role drop-down menu.
- Leave the Propagate to children check box selected in most cases.
- Click OK.
- Identify the user or group that will have the privileges defined by the selected role.
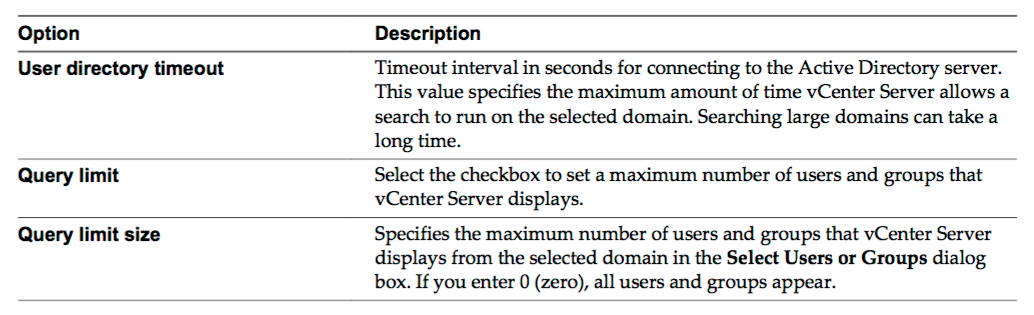
Change permission validation settings
vCenter Server periodically validates its user and group lists against the users and groups in the user directory. It then removes users or groups that no longer exist in the domain. You can disable validation or change the interval between validations. If you have domains with thousands of users or groups, or if searches take a long time to complete, consider adjusting the search settings.
- Browse to the vCenter Server system in the vSphere Web Client object navigator.
- Select the Manage tab and click Settings.
- Click General and click Edit.
- Select User directory.
- Change the values as needed.
- Click OK.
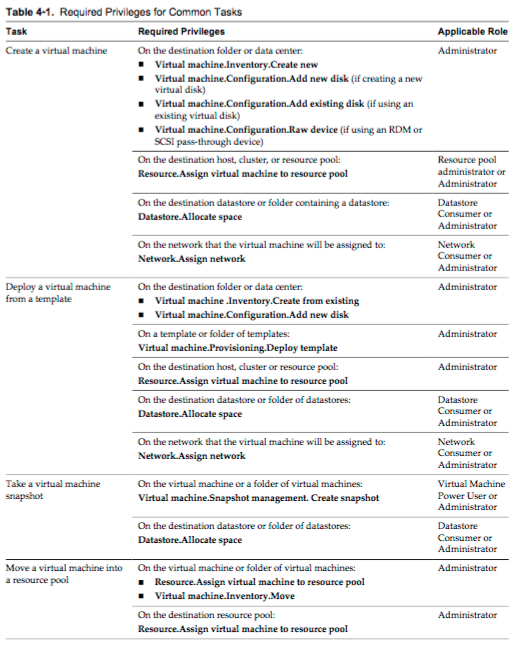
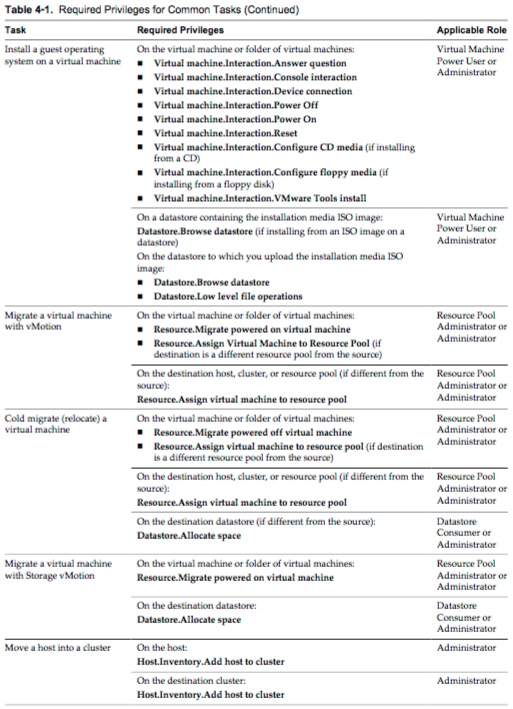
Determine the appropriate set of privileges for common tasks in vCenter Server
- Many tasks require permissions on more than one object in the inventory. You can review the privileges that are required to perform the tasks and, where applicable, the appropriate sample roles.
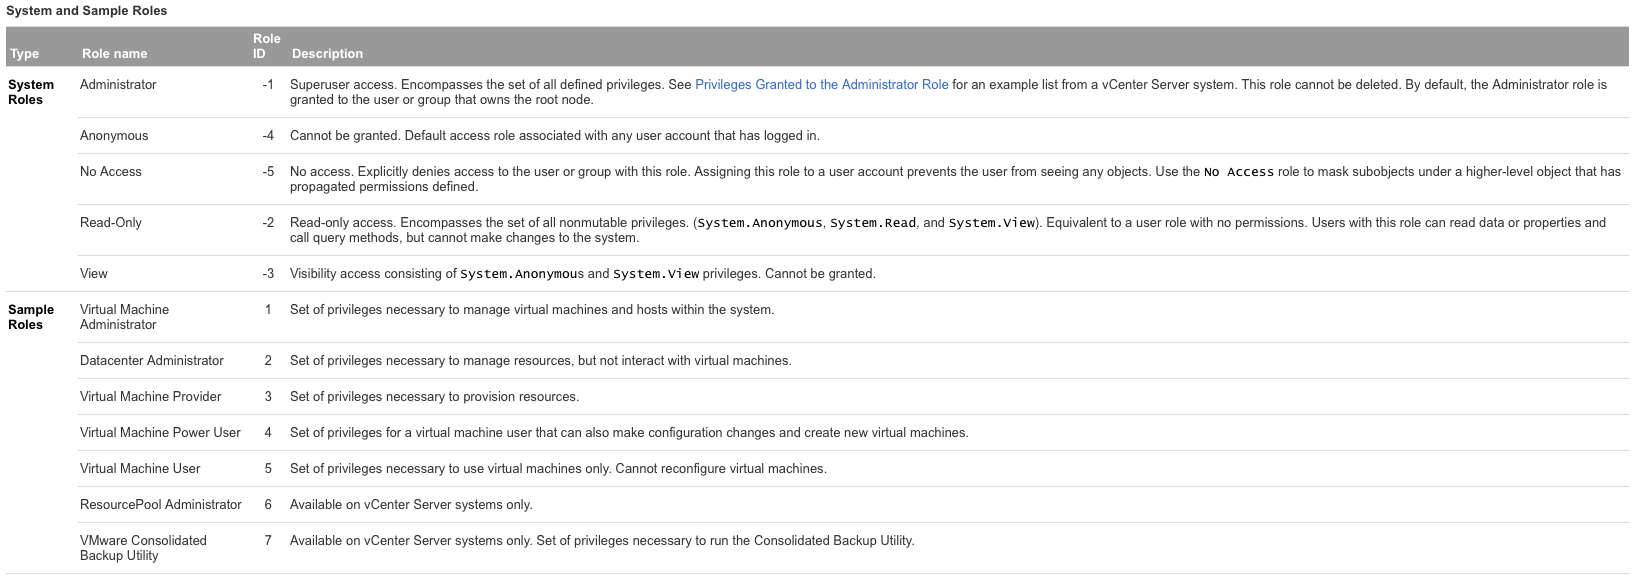
Compare and contrast default system/sample roles
System roles
- Cannot be modified or deleted.
Sample roles
- Apply to different user communities or restrict access for add-on tools. Several predefined user roles are included with vCenter Server and with ESXi systems. You can create new roles using these predefined user roles as a starting point.
Determine the correct permissions needed to integrate vCenter Server with other VMware products
- Global permissions are applied to a global root object that spans solutions, for example, both vCenter Server and vCenter Orchestrator. Use global permissions to give a user or group privileges for all objects in all object hierarchies.
- Each solution has a root object in its own object hierarchy. The global root object acts as a parent object to each solution object. You can assign global permissions to users or groups, and decide on the role for each user or group. The role determines the set of privileges. You can assign a predefined role or create custom roles. It is important to distinguish between vCenter Server permissions and global permissions.
Objective 1.2: Secure ESXi, vCenter Server, and vSphere Virtual Machines
- Harden virtual machine access
- Control VMware Tools installation
- VM.disable-VMtools-autoinstall
- Parameter: isolation.tools.autoInstall.disable
- Value: TRUE
- VM.disable-VMtools-autoinstall
- Control VM data access
- Configure virtual machine security policies
- The guest operating system that runs in the virtual machine is subject to the same security risks as a physical system. Secure virtual machines as you would secure physical machines.
- Control VMware Tools installation
- Harden a virtual machine against Denial-of-Service attacks
- Control VM-VM communications
- Control VM device connections
- Configure network security policies
- Networking security policies determine how the adapter filters inbound and outbound frames.
- 3 types are as follows
- Promiscuous Mode
- Reject — Placing a guest adapter in promiscuous mode has no effect on which frames are received by the adapter.
- Accept — Placing a guest adapter in promiscuous mode causes it to detect all frames passed on the vSphere standard switch that are allowed under the VLAN policy for the port group that the adapter is connected to.
- Mac Address Changes
- Reject — If you set the MAC Address Changes to Reject and the guest operating system changes the MAC address of the adapter to anything other than what is in the .vmx configuration file, all inbound frames are dropped.
- Accept — Changing the MAC address from the Guest OS has the intended effect: frames to the new MAC address are received.
- Promiscuous Mode
- Forged Transmits
- Reject — Any outbound frame with a source MAC address that is different from the one currently set on the adapter are dropped.
- Accept — No filtering is performed and all outbound frames are passed.
- Harden ESXi Hosts
- Enable/Configure/Disable services in the ESXi firewall
- You can configure firewall properties to allow or deny access for a service or management agent.
- This can currently be set via the vSphere Web Client, vSphere client or command line.
- Select a host from the inventory view and select configuration and then Security Profile.
- Change default account access
- Add an ESXi Host to a directory service
- You can configure a host to use a directory service such as Active Directory to manage users and groups.
- When you add an ESXi host to Active Directory all user and group accounts are assigned full administrative access to the host if the group ESX Admins exists.
- Apply permissions to ESXi Hosts using Host Profiles
- When you join a host to an Active Directory domain, you must define roles on the host for a user or group in that domain. Otherwise, the host is not accessible to Active Directory users or groups. You can use host profiles to set a required role for a user or group and to apply the change to one or more hosts.
- In the vSphere client select Management and then Host Profiles you can either use an existing or new host profile.
- Expand the profile tree and select Security Configuration, Permission Rules, Add Profile, Permission and then within configuration details use require a permission rule and add the appropriate settings. You can then select propagate permission and select ok.
- Enable Lockdown Mode
- Select a host from the inventory view and select configuration and then Security Profile. Click edit next to lockdown mode and select Enable.
- Control access to hosts (DCUI/Shell/SSH/MOB)
- By default, the ESXi Shell and SSH services are not running and only the root user can log in to the Direct Console User Interface (DCUI). If you decide to enable ESXi or SSH access, you can set timeouts to limit the risk of unauthorized access.
- Enable/Configure/Disable services in the ESXi firewall
- Harden vCenter Server
- Control datastore browser access
- You can use the Datastore.Low level file operations priveledge to restrict access to the database browser.
- Allows performing read, write, delete, and rename operations in the datastore browser.
- You can use the Datastore.Low level file operations priveledge to restrict access to the database browser.
- Create/Manage vCenter Server Security Certificates
- The vSphere Certificate Manager utility allows you to perform most certificate management tasks interactively from the command line. vSphere Certificate Manager prompts you for the task to perform, for certificate locations and other information as needed, and then stops and starts services and replaces certificates for you.
- Control MOB access
- Use the Managed Object Browser only for debugging, and ensure that it is disabled in production systems.
- Select the host in the vSphere Web Client and go to Advanced System Settings.
- Check the value of Config.HostAgent.plugins.solo.enableMob and change it as appropriate.
- Use the Managed Object Browser only for debugging, and ensure that it is disabled in production systems.
- Change default account access
- Because many appliances do not include default user accounts, the root account may still be able to directly login via SSH. To meet the compliance standards for non- repudiation, the SSH server on all hardened appliances comes preconfigured with the AllowGroups wheel entry to restrict ssh access to the secondary group wheel.
- Restrict administrative privileges
- Many tasks can be performed by the root user by default. Instead of allowing administrators to log in to the ESXi host using the root user account, you can apply different host configuration privileges to different named users from the vCenter Server permissions management interface. You can create a custom roles, assign privileges to the role, and associate the role with a named user and an ESXi host object from the vSphere Web Client.
- Control datastore browser access
- Understand the implications of securing a vSphere environment
- Security hardening for a typical Linux system potentially requires dozens of steps, such as changing file permissions, disabling services, and managing user privileges; ESXi requires none of these steps, most of which either are impossible to perform or have no effect. The primary measures required for hardening an ESXi host involve securing and properly managing the interfaces with the system that are used for configuration, management, and troubleshooting.
Objective 1.3: Enable SSO and Active Directory Integration
Describe SSO architecture and components
- vCenter Single Sign-On allows vSphere components to communicate with each other through a secure token mechanism instead of requiring users to authenticate separately with each component.
- Below are some examples of the SSO architecture for human and solution users

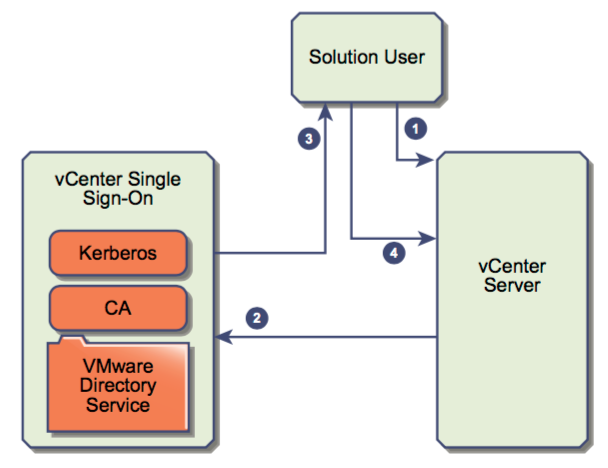
Differentiate available authentication methods with VMware vCenter
- vCenter Single Sign-On uses a combination of STS (Security Token Service), SSL for secure traffic, and authentication of human users through Active Directory or OpenLDAP and of solution users through certificates.
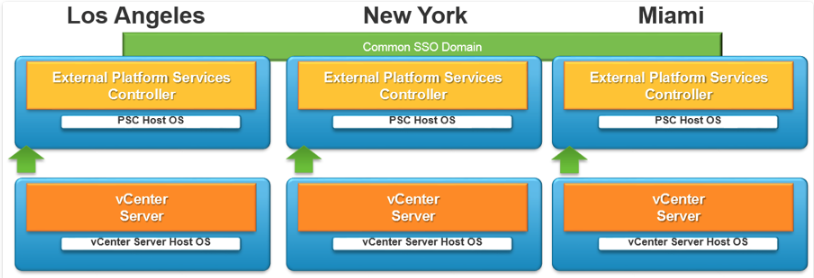
Perform a multi-site SSO installation
- In this configuration each site is independent with PSC replication between sites. The vCenter Server is aware of the site topologies and use the local PSC under normal circumstances. Customers are able to seamlessly move the vCenter Servers between PSCs when necessary. This topology allows for Enhanced Linked Mode (ELM) which is facilitated by the PSC. Enhanced Linked Mode provides for a single point of management for all vCenter Servers in the same vSphere domain. In vSphere 6 the Windows-based and Virtual Appliance-based vCenter Servers have the same operational maximums and can belong to the same linked mode configuration. The configuration replicates all license, global permissions, tags and roles across all sites
Configure/Manage Active Directory Authentication
- Active Directory authentication is configured from the Single Sign-On administration page, here you will add an additional identify source for Active Directory.
- If using Microsoft Active Directory, select Active Directory (Integrated Windows Authentication). It will auto-populate the root domain in the forest. If using Open LDAP, select and configure it.
Configure/Manage Platform Services Controller (PSC)
- The PSC includes common services used across VMware vCloud® Suite. This includes VMware vCenter Single Sign-On™, licensing, and certificate management.
- This is managed and configured by using the vSphere Web Client and selecting Administration and then System configuration and choosing the appropriate node.
Configure/Manage VMware Certificate Authority (VMCA)
- VMCA is included in each Platform Services Controller and in each embedded deployment. VMCA provisions each node, each vCenter Server solution user, and each ESXi host with a certificate that is signed by VMCA as the certificate authority. vCenter Server solution users are groups of vCenter Server services. See vSphere Security for a list of solution users. You can replace the default certificates. For vCenter Server components, you can use a set of command-line tools included in your installation. You have several options.
- You can either use the VMCA as a certificate authority or configure it to be an intermediate CA.
Enable/Disable Single Sign-On (SSO) Users
- You configure vCenter Single Sign-On from the vSphere Web Client. To configure vCenter Single Sign-On, you must have vCenter Single Sign-On administrator privileges. Having vCenter Single Sign-On administrator privileges is different from having the Administrator role on vCenter Server or ESXi. By default, only the user administrator-vsphere.local has administrator privileges on the vCenter Single SignOn server in a new installation Identify available authentication methods with VMware vCenter
Upgrade a single/multi-site SSO installation
Configure SSO policies
- Password Policy: You can configure the following parameters:
- Description – Password policy description. Required.
- Maximum lifetime – Maximum number of days that a password can exist before it has to be changed.
- Restrict re-use – Number of the user’s previous passwords that cannot be set again.
- Maximum length – Maximum number of characters that are allowed in the password.
- Minimum length – Minimum number of characters required in the password.
- Character requirements – Minimum number of different character types required in the password.
- Identical adjacent characters – Maximum number of identical adjacent characters allowed in the password.
- Lockout Policy: Specifies the condition under which a vCenter SSO account is locked when the user attempts to log in with incorrect credentials. Five login attempts and three minutes between failures are set by default. This policy also specifies the time that must elapse before the account is automatically unlocked.
- Description – Description of the lockout policy. Required.
- Max. number of failed login attempts – Maximum number of failed login attempts that are allowed before the account is locked.
- Time interval between failures (seconds) – Time period in which failed login attempts must occur to trigger a lockout.
- Unlock time (seconds) – Amount of time that the account remains locked. If you enter 0, the account must be explicitly unlocked by an administrator.
- Token Policy
- Maximum token renewal count
- Maximum token delegation count
- Maximum bearer token lifetime
- Maximum holder-of-key token lifetime
- Password Policy: You can configure the following parameters:
Add/Edit/Remove SSO identity sources
- Open your Web browser and navigate to https://vcenter:9443, where vcenter is the FQDN of the vCenter Server.
- Log in with User name [email protected] and the Password used during installation.
- Click Administration in the left-hand Navigator pane
- Click Configuration under vCenter Single Sign-On
- Click Identity Sources
- Click the green plus icon to Add Identity Source.
- If using Microsoft Active Directory, select Active Directory (Integrated Windows Authentication). It will autopopulate the root domain in the forest. If using Open LDAP, select and configure it.
- Highlight the newly added identity source. Click the Set as Default Domain icon.
- Click Yes in the pop-up.
Add an ESXi Host to an AD domain
- Select a host in the vSphere Client inventory, and click the Configuration tab.
- Under Software, click Authentication Services.
- Click Properties.
- In the User Directory Services dialog box, select the directory service from the drop-down menu.
- Enter a domain.
- Click Join Domain.
- Enter the user name and password of a directory service user who has permissions to join the host to the domain, and click OK.
- Click OK to close the Directory Services Configuration dialog box.
Check out another blueprint section
- Section 1: Configure and Administer vSphere 6.x Security
- Section 2: Configure and Administer Advanced vSphere 6.x Networking
- Section 3: Configure and Administer Advanced vSphere 6.x Storage
- Section 4: Upgrade a vSphere Deployment to 6.x
- Section 5: Administer and Manage vSphere 6.x Resources
- Section 6: Backup and Recover a vSphere Deployment
- Section 7: Troubleshoot a vSphere Deployment
- Section 8: Deploy and Consolidate vSphere Data Center
- Section 9: Configure and Administer vSphere Availability Solutions
- Section 10: Administer and Manage vSphere Virtual Machines