- Upgrading Platform Services Controller and vCenter Server via the CLI Installer
Upgrading Platform Services Controller and vCenter Server via the CLI Installer
The first topic we will cover in our Automating your vSphere Upgrade series is updating our core infrastructure. Upgrading Platform Services Controller(PSC) and vCenter Server via the CLI installer. In our workshops one of the common things I hear is that most folks aren’t using the CLI based tools that have been included in the installer. I am a huge fan of these as they make migrations and upgrades seamless–especially when having to perform the task if you have multiple PSC’s and vCenter Servers. Using the CLI tools don’t have to be intimidating, as we go through this blog we will cover some how-to’s and benefits of using the CLI based approach.
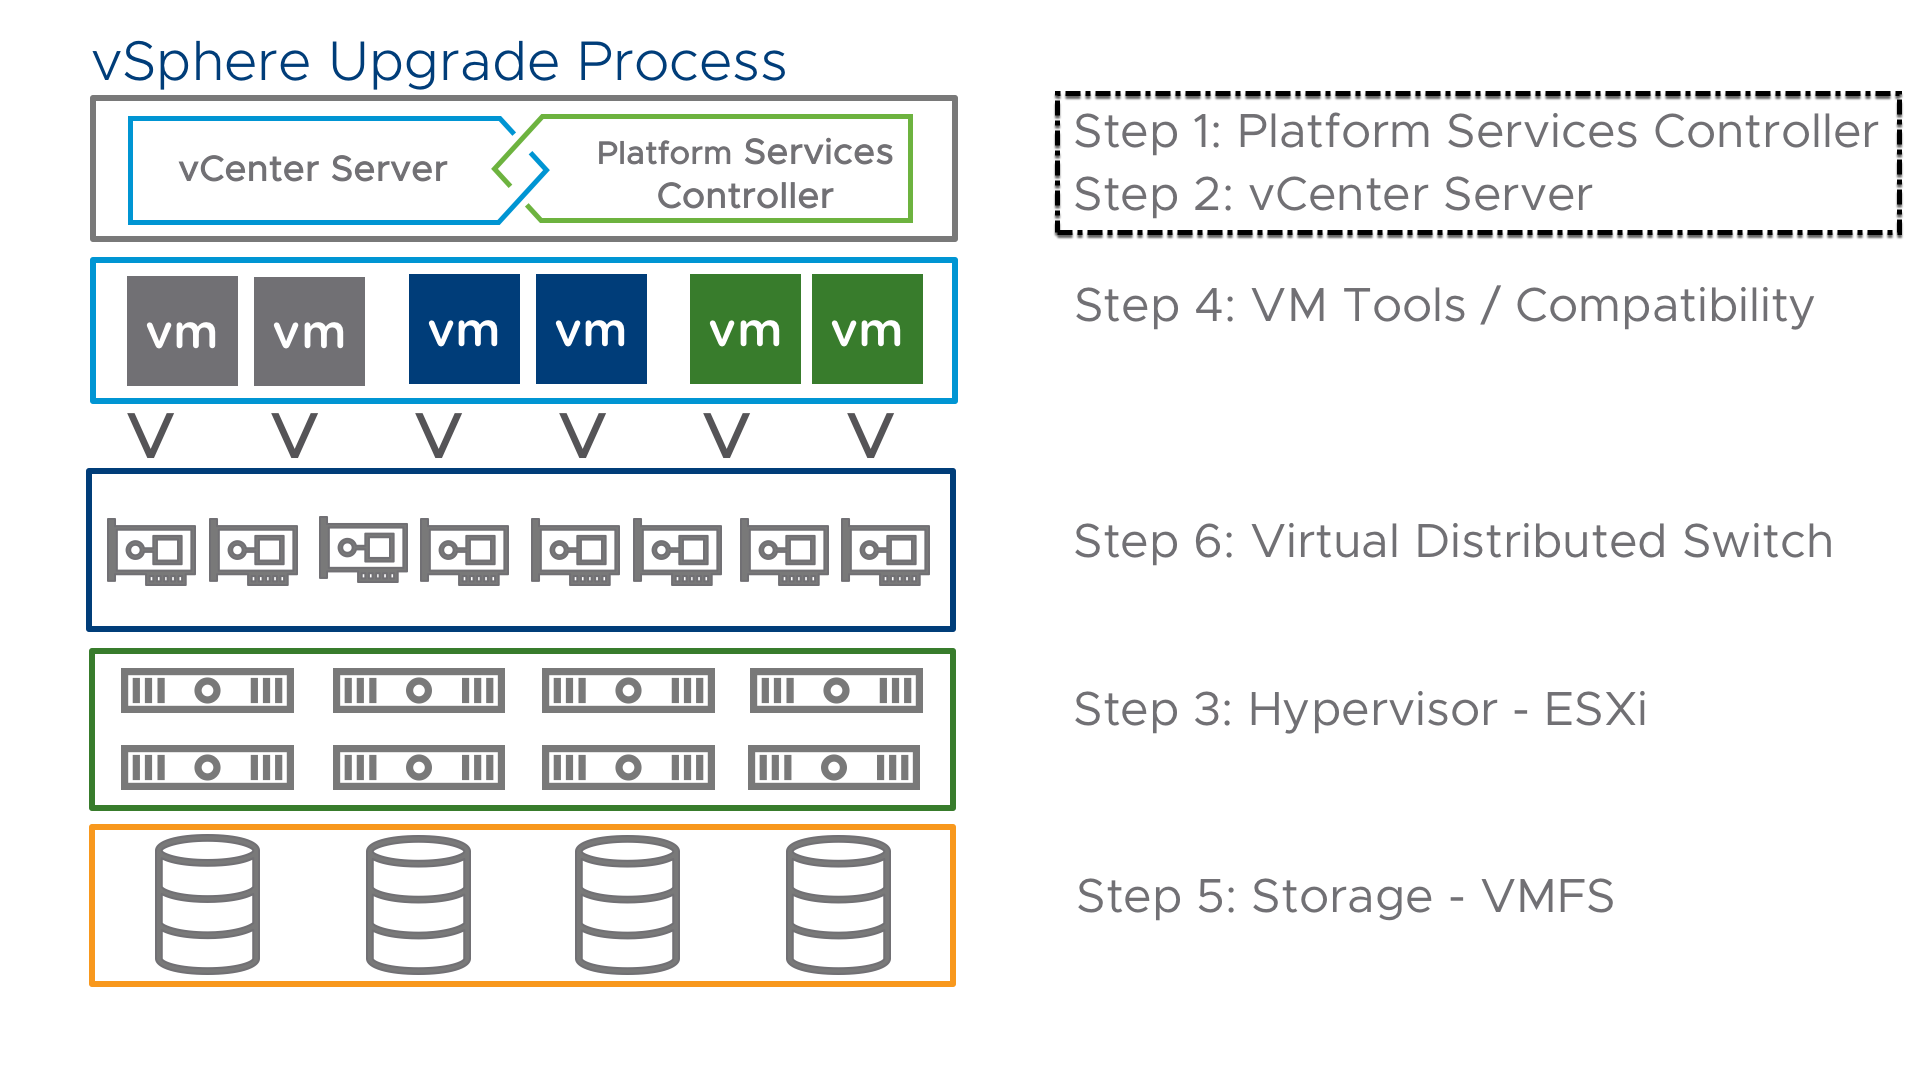
When we start our vSphere Upgrade the first thing we want to do is to upgrade our PSC and vCenter Server before updating other components. If we happen to be using an Embedded PSC deployment the upgrade is simple, we can do the upgrade in one step (Step 1 and Step 2 combined). However, if we are using an External PSC deployment we must upgrade all of our PSC’s within the same SSO domain first prior to upgrading any vCenter Servers–so this becomes a multi-step process.
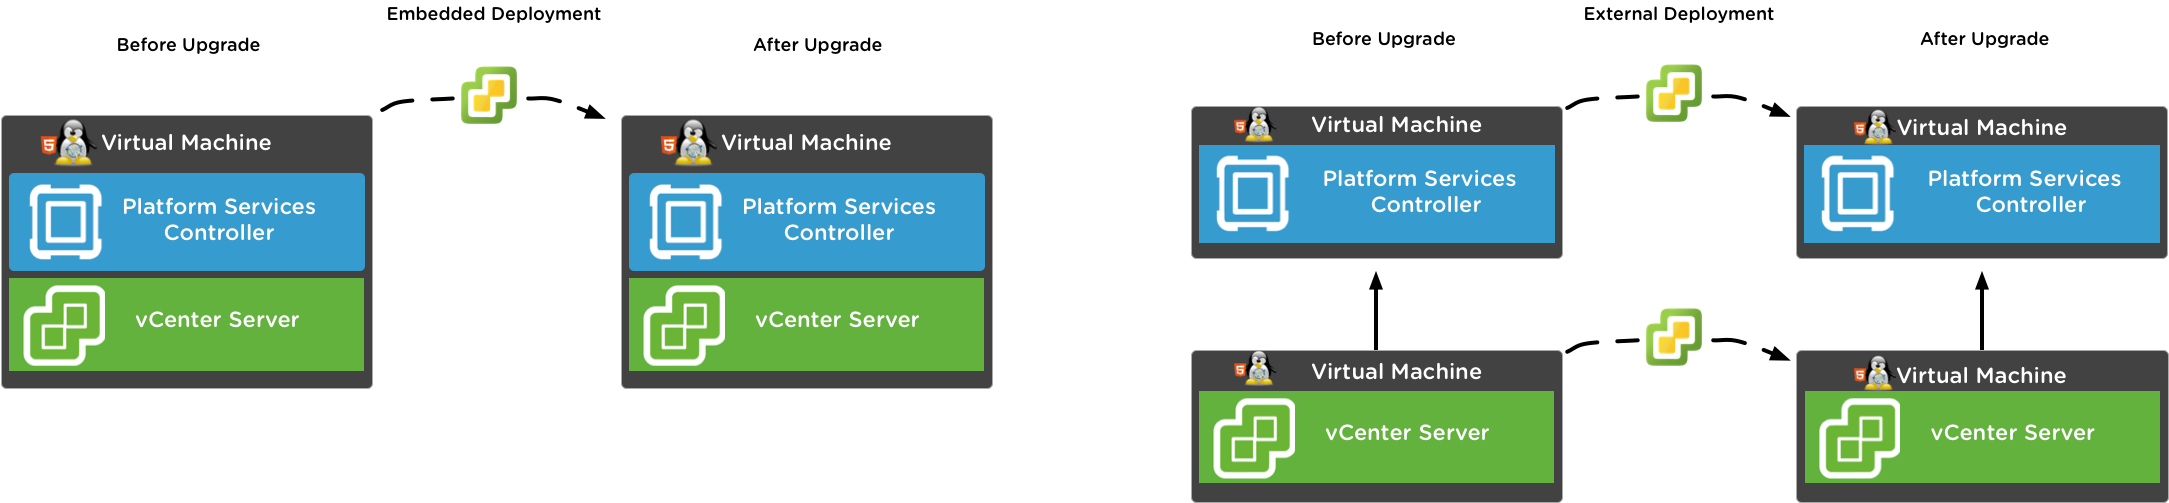
For this upgrade scenario we will be performing an upgrade from an External PSC deployment using appliances on vSphere 6.0 to an External PSC deployment using appliances on vSphere 6.7.
Prepare Your JSON Configuration File for CLI Upgrade
When doing a CLI based upgrade, we use a configuration file template (JSON) that is part of the vCenter Server Appliance (VCSA) ISO. When you mount the ISO you will see a directory labelled vcsa-cli-installer and within that folder is a directory called templates. Once you are here you have the option to see the CLI templates for install, migrate and upgrade. As a reminder a migration is when we are moving from a vCenter Server on Windows, and an upgrade is when we are moving from VCSA to VCSA.
Since we are doing an upgrade we will browse to that folder and we are left seeing a vcsa6.0 and vcsa6.5 directory. The information we need when coming from each version is different so there is a unique set of templates for each version. Since we are upgrading from a vSphere 6.0 deployment we will head into the vcsa6.0 directory.
Once we are in this directory we can see a few different templates. We have a template for an embedded deployment, external PSC and external vCenter Server. Each template has an associated version whether or not we will be connecting to a vCenter Server or an ESXi host directly. The embedded template is for an embedded deployment which does both PSC and vCenter Server at the same time as we mentioned above, and the PSC and VCSA are separate templates as we need to do these one at a time.
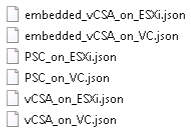
Since we have an External PSC deployment and we are using a vCenter Server, we will first open the PSC_on_VC.json.
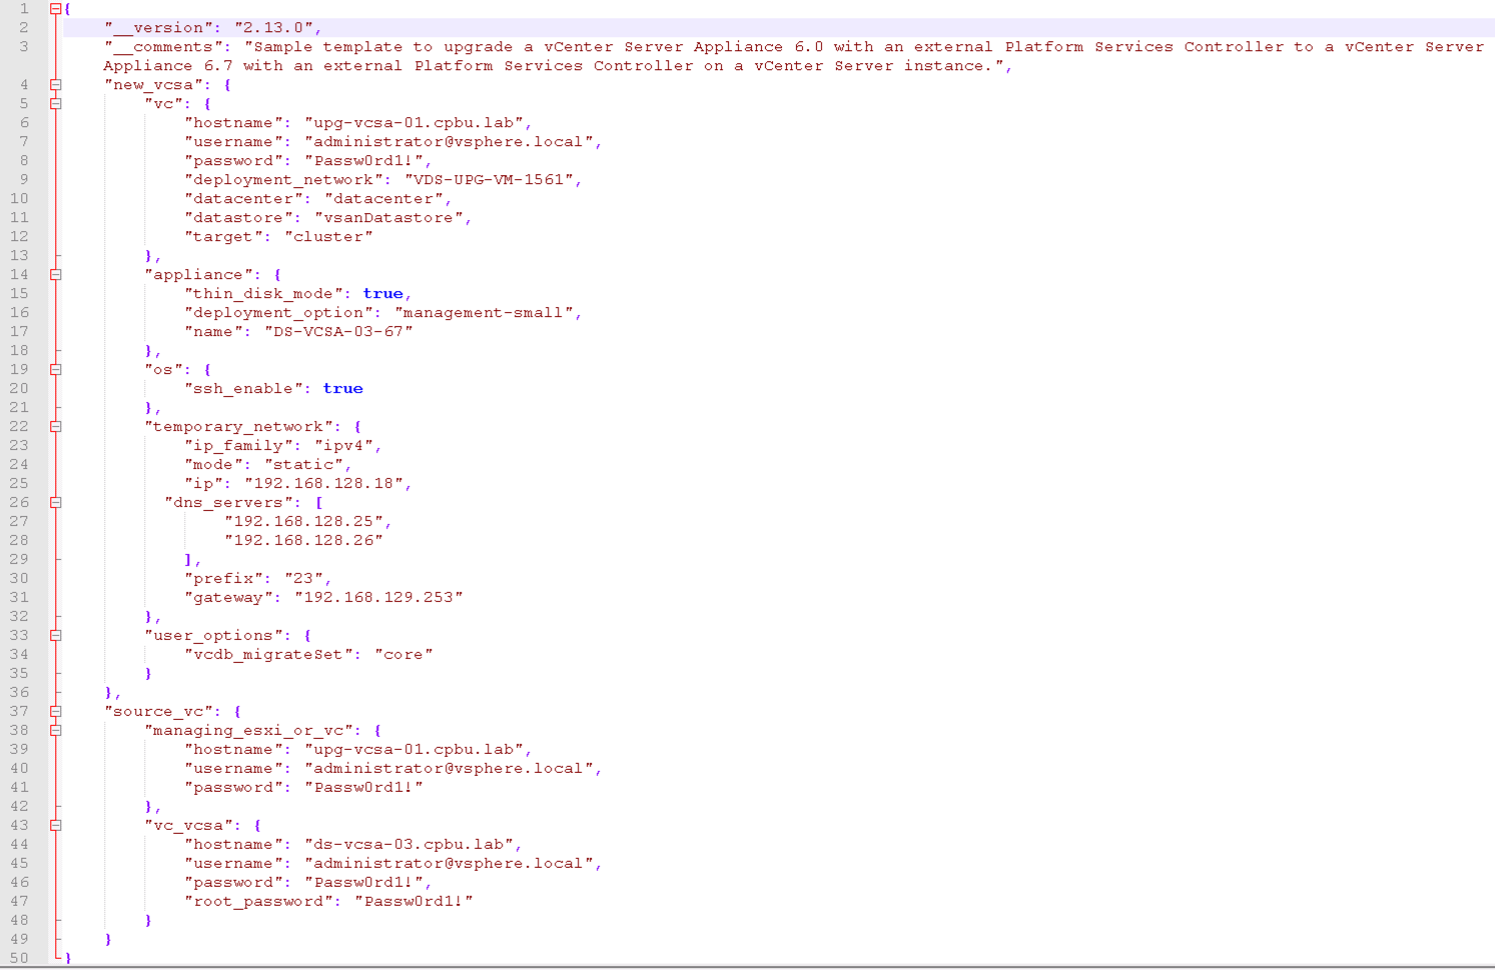
When opening this file at first glance you might say WOAH! That looks complicated, but there is quite a bit of extra text explaining each field. Lets fill in the blanks with the required information and take another look.

This looks a lot better, we can clearly see the details it is asking for. The vCenter Server to deploy the new appliance to, the appliance information, the temporary IP to use, and then last but not least the source information for the appliance we are upgrading. If we have a deployment where there are multiple PSC’s we could see how easy it would be to make a copy of this file, and edit lines 17 and 41 putting in the second PSC and then re-saving. How much time saving could this be!? With vSphere 6.5 allowing 10 PSC’s per SSO domain and vSphere 6.7 allowing 15 this could be quite a bit of time saved!
Next up, its time to upgrade our vCenter Server. To get our JSON file ready we will head back and grab the vCSA_on_VC.json template. Also remember that if you happen to have multiple VCSA’s to upgrade you can easily update lines 16 ,17 and 40 to upgrade other appliances in your environment.
Certain sensitive fields such as passwords can be left blank if chosen. When the CLI installer is run it will prompt for the password during runtime.
Now that we have prepared our templates for our upgrade, the next section we will jump into how to actually perform our upgrade using the CLI.
More information on preparing the JSON template can be found here.
Upgrade a vCenter Server Appliance or Platform Services Controller Appliance by Using the CLI
CLI templates in hand, its now for the fun. Using these templates we will automate our upgrade. vSphere 6.0 originally introduced this concept of a CLI based tool, however its been enhanced with vSphere 6.7. With vSphere 6.7 we now have a “batch template” technology built into the installer. Prior to vSphere 6.7 we had to run the installer against a single JSON file and wait for it to finish, we would then have to manually kick off the second JSON file when the previous one completes. With the batch upgrade we can put multiple JSON files into a single directory and point the installer to the directory and it is smart enough to map out the dependencies and upgrade the PSC’s first and then the vCenter Servers.
Before we actually perform our upgrade, I want to explain some of the benefits of the CLI installer. If we happened to be using the GUI based upgrade, everything in that upgrade would have to be manually entered into the GUI and obviously that is susceptible to typos and errors. Also, if we happened to enter some incorrect information and had to retry our upgrade we would again have to re-type all that information. What if we had a way to perform an upgrade test without ever touching our production environment? With the CLI Installer we do! And its called a pre-check. When running the CLI installer with the --precheck-only flag we have the ability to go through a full dry run of our upgrade. If we happened to have a typo, insufficient capacity or any other errors it would spit this out, and we could easily correct the settings.
To run our CLI based installer we will mount our vSphere 6.7 media as that is the version we are going to. We will again navigate to the vcsa-cli-installer directory. From here depending on the operating system of the machine we are on we will either navigate to the lin64, win32 or mac folder to use the supported installer for that operating system.
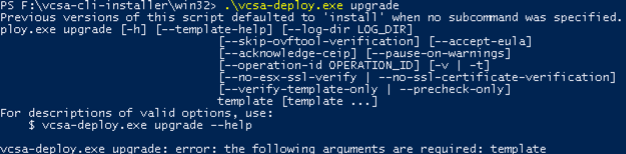
Here we will see quite a few files, but the one we want to focus on is vcsa-deploy.exe in the win32 folder since I will be running this from a windows machine. If we run .\vcsa-deploy.exe upgrade it will give us the details on how to properly use the CLI tool.
As I mentioned previously one of the benefits of using the CLI tool is that you can execute a pre-check of your template against the environment to make sure things will pass. Usually with upgrades and migrations a big issue we see with them failing is due to a smaller appliance size being chosen for the new appliance or insufficient capacity in the vCenter Server environment. In this environment we will execute our vcsa-deploy utilizing the pre-check option and see our results.
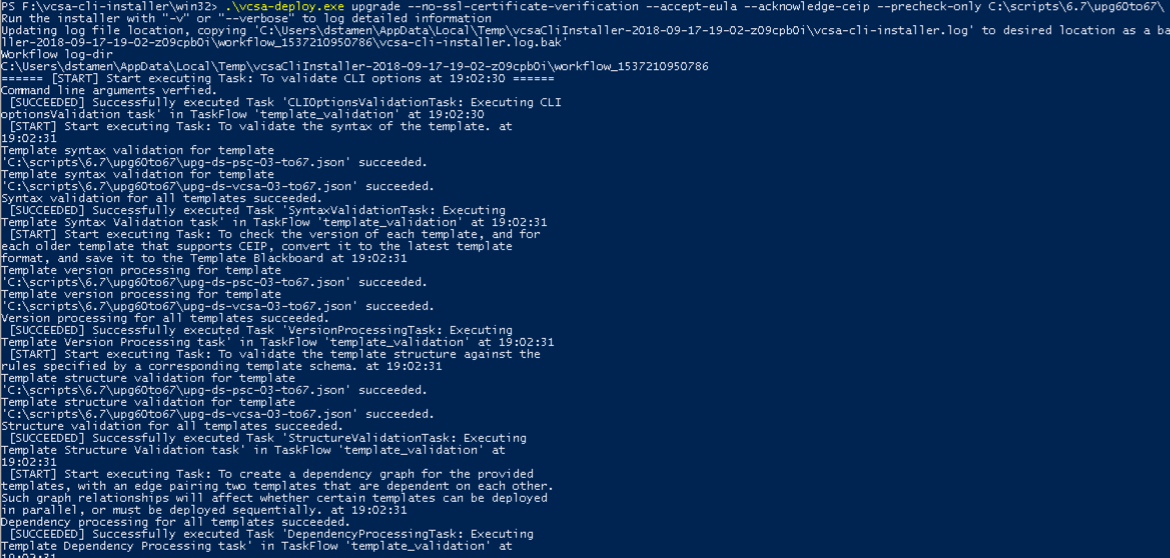
To run the pre-check I ran the following command: .\vcsa-deploy.exe upgrade --no-ssl-certificate-verification --accept-eula --acknowledge-ceip --precheck-only C:\scripts\\6.7\upg60to67\
I chose to point this to the folder to take advantage of the batch upgrade vs pointing it to the individual file, as I mentioned earlier it is smart enough to map out the dependencies as we can see from the below image.
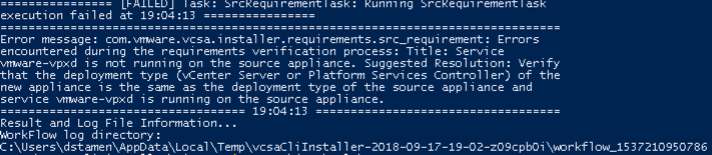
Once the pre-check runs through we will either get a success or failure. In the image below my vCenter Server services were not running so the pre-check failed.
Now that we have the service running and re-run our pre-check we can see everything is successful and we can now proceed to remove the –precheck-only flag from our command.
.\vcsa-deploy.exe** **upgrade --no-ssl-certificate-verification --accept-eula --acknowledge-ceip C:\scripts\\6.7\upg60to67\
The upgrade process is now happening without any additional user input. If you need to step away for lunch or if a co-worker needs you there is no additional action that is needed until the end. If you were using the GUI based approach once Stage 1 where the appliance is deployed is complete you have to manually start Stage 2 to configure the upgraded appliance. With the CLI based installer this is not needed. When our upgrade is complete we will be presented with the vCenter Server and login information as we can see below.

More information on Upgrading your PSC and vCenter Server via the CLI can be found here.
Conclusion
Automating your vSphere Upgrade does not have to be scary or hard, as we went through the steps its actually quite easy. Now that we have our PSC and vCenter Server updated we can now proceed to our next step which is automating the upgrade of our ESXi hosts.
Cross-Posted from vSphere Blog
comments powered by DisqusSee Also
- Upgrading to VMware vSphere 6.7
- Patching your vCenter Server Appliance from 6.7 to 6.7a
- vCenter 6.5U1 Update Issues with VCHA Advanced Deployment
- vSphere 6.5 - Updating Appliance configured with vCenter HA
- Reconfigure HA - The object 'vim.Datastore:datastore-XXXX' has already been deleted or has not been completely created