- Part 3: Deploying vSphere with Kubernetes - Deploy and Configure NSX-T
Part 3: Deploying vSphere with Kubernetes - Deploy and Configure NSX-T
vSphere 7 with Kubernetes is finally here and I couldn’t be more excited for it to be available. This blog series will cover the requirements, prequisites and deployment steps in order to deploy a vSphere with Kubernetes (vk8s) environment using vSphere 7 and NSX-T 3.0.
Part 3 covers the deployment and configuration of NSX-T. Now that we have configured our vCenter Server lets proceed. You can follow along in the official documentation
Deploy NSX Manager
NSX Manager is deployed as an appliance and you can utilize the vSphere Client or ovftool to deploy.
& 'C:\Program Files\VMware\VMware OVF Tool\ovftool.exe' --name=ds4nsx1.fsa.lab --X:injectOvfEnv --X:logFile=ovftool.log --allowExtraConfig --datastore="M50-VC01-DS01" --network="management" --acceptAllEulas --noSSLVerify --diskMode=thin --powerOn --prop:nsx_role="NSX Manager" --prop:nsx_ip_0=10.21.230.86 --prop:nsx_netmask_0=255.255.255.0 --prop:nsx_gateway_0=10.21.230.1 --prop:nsx_dns1_0=10.21.230.6 --prop:nsx_domain_0="fsa.lab" --prop:nsx_ntp_0="us.pool.ntp.org" --prop:nsx_isSSHEnabled=True --prop:nsx_allowSSHRootLogin=True --prop:nsx_passwd_0=VMware1!VMware1! --prop:nsx_cli_passwd_0=VMware1!VMware1! --prop:nsx_hostname=nsxmanager.vmware.demo C:\share\VMware\NSX\nsx-unified-appliance-3.0.0.0.0.15946739.ova 'vi://dstamen:[email protected]/Datacenter/host/Cluster01/Resources'
Configuring NSX
Once NSX Manager is deployed we can proceed to configure the environment for vk8s.
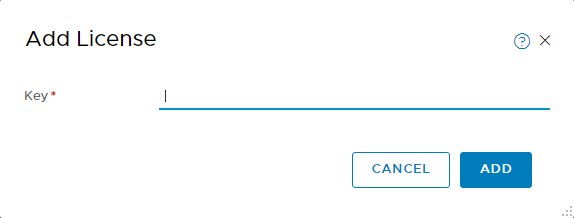
Assign an NSX-T license by navigating within NSX Manager to System > Licenses > Add
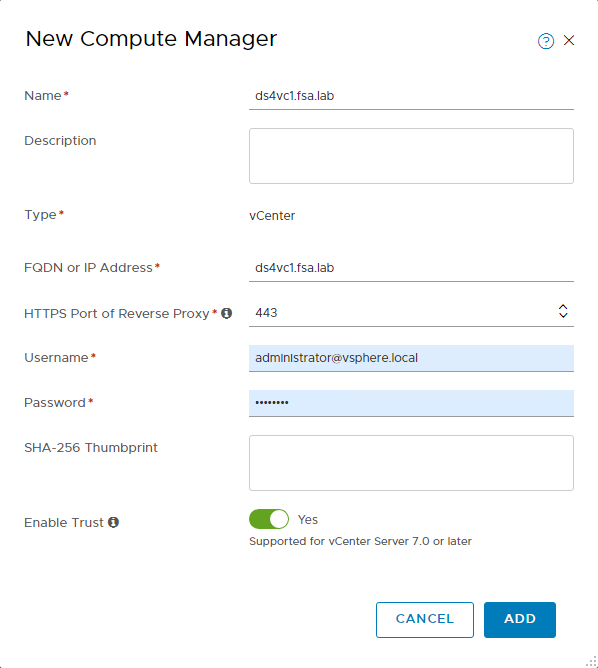
Add a Compute Manager by navigating within NSX Manager to System > Fabric > Compute Managers > Add. Do not Proceed until Registration Status is Registered
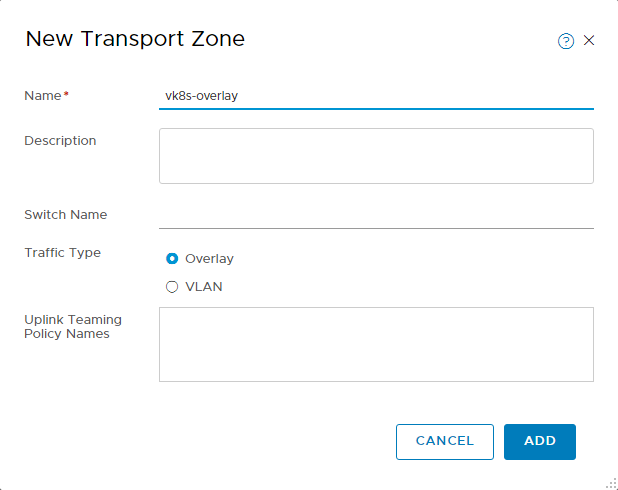
Create two Transport Zones by navigating to System > Transport Zones > Add. The first will be an Overlay Transport Zone
The second will be an VLAN Transport Zone

Create two Uplink Profiles by navigating to System > Fabric > Profiles > Uplink Profiles > Add.
Host Uplink
- Specify a Name
- Under Teamings, set your Active Uplinks
- Specify your first TEP VLAN (this must be routable to the second TEP VLAN)
Edge Uplink
- Specify a Name
- Under Teamings, set your Active Uplinks
- Specify your second TEP VLAN (this must be routable to the first TEP VLAN)

Create two IP Pools by navigating to Networking > IP Address Pools > IP Address Pools > Add IP Address Pools.
How to create an IP Pool
- Specify a Name
- Under Subnets -> Set -> Add Subnet -> IP Ranges
- Specify an IP Range
- Specify the CIDR for the range
- Specify the Gateway for the range
- Click Add and then Save.

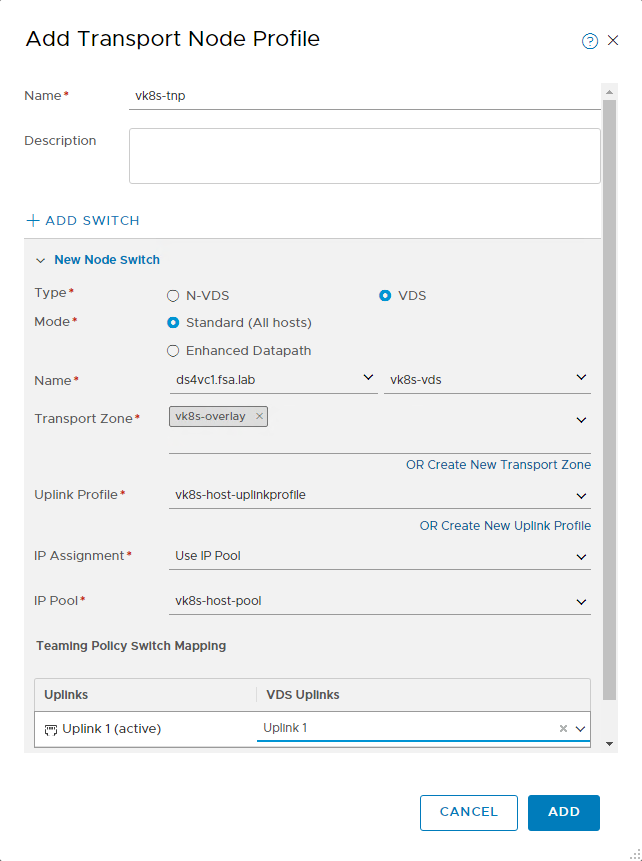
Create a Transport Node Profile by navigating to System > Fabric > Profiles > Transport Node Profiles > Add
TNP Settings
- Specify a Name
- Set type to VDS
- Set mode to Standard
- Select your VC under Name and Select your VDS
- Select your Overlay Transport Zone
- Select your Host Uplink Profile
- Select your Host IP Pool
- Select your VDS Uplink
Assign your Transport Node Profile to your Cluster by navigating to System > Fabric > Nodes > Host Transport Nodes > Managed By. Select your vCenter Server, then select your Cluster and Click Configure NSX. Select your Transport Node Profile and click Apply.
This process will take some time as it prepares the hosts for NSX

Verify the Transport Node Profile was successfully applied.

Now should be your first test of network connectivity between the host TEP interfaces. SSH to an an ESXi host and use vmkping to make sure your VLAN and MTU settings are correct.
vmkping -I vmk10 192.168.142.11 -S vxlan -s 1572
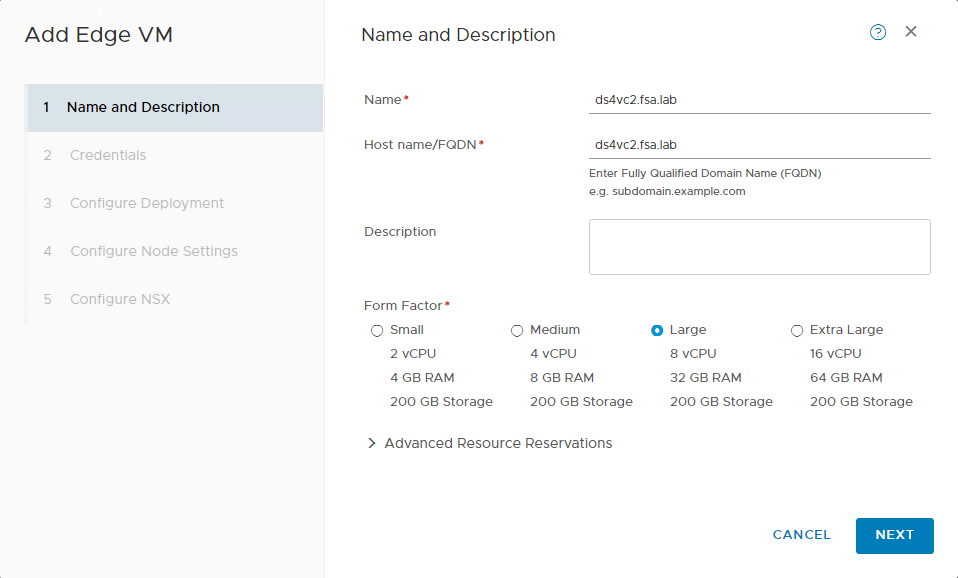
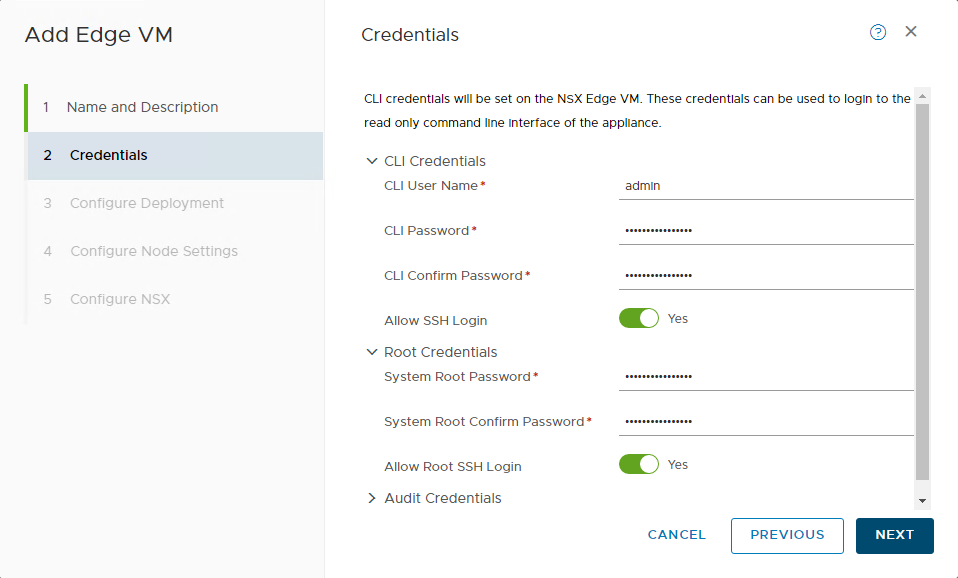
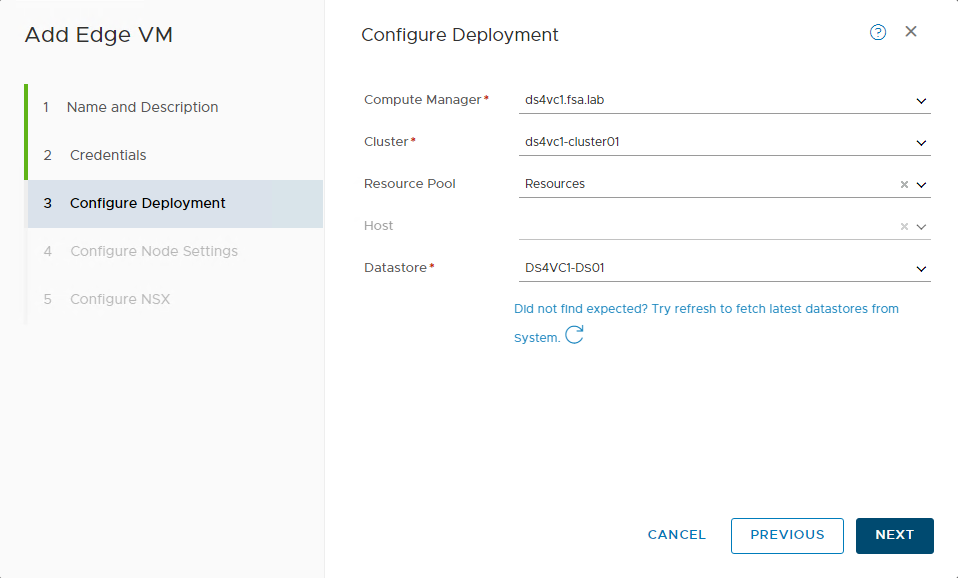
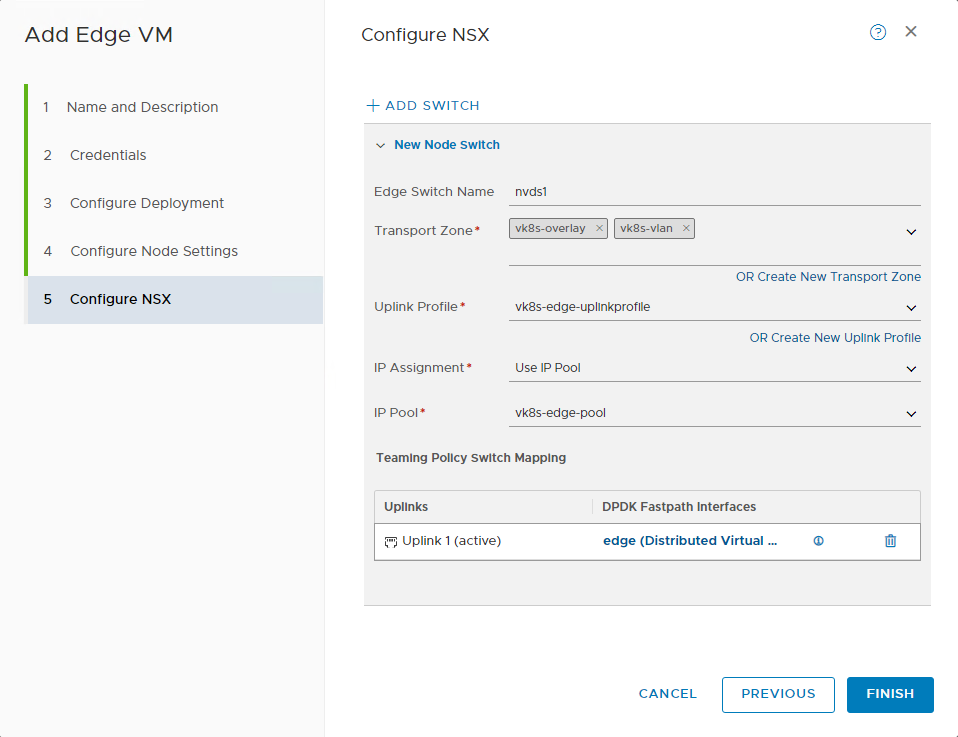
Deploy your NSX Edge(s) by navigating to System > Fabric > Nodes > Edge Transport Nodes > Add Edge VM. In my deployment I am using one, but for production you should be using at least 2.
Follow the below screenshots for the NSX Edge settings. You must use at least a Large form factor.

Wait until the Edge shows a Configuration Status of Success.

Now should be your second test of network connectivity between the host TEP and edge TEP interfaces. SSH to an an ESXi host and use vmkping to make sure your VLAN and MTU settings are correct.
vmkping -I vmk10 192.168.234.10 -S vxlan -s 1572
If you are unable to ping between TEP interfaces do NOT proceed and troubleshoot connectivity now
Create an Edge Cluster by navigating to System > Fabric > Nodes > Edge Clusters > Add

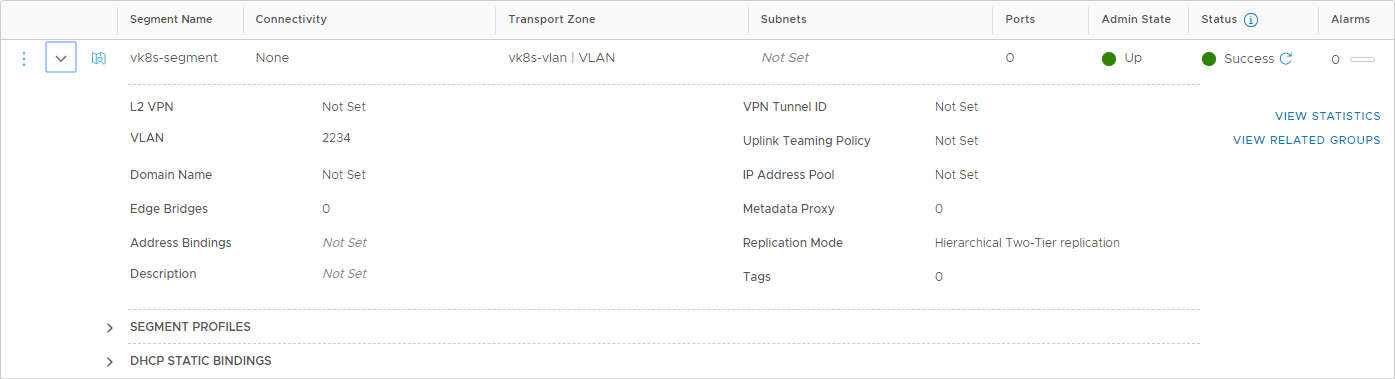
Create a Segment for the Tier0 Gateway by navigating to Networking > Segments > Add Segment
- Specify a Name
- Select your VLAN Transport Zone
- Specify your Edge Uplink VLAN (VLAN where the ingress/egress CIDR’s will be)
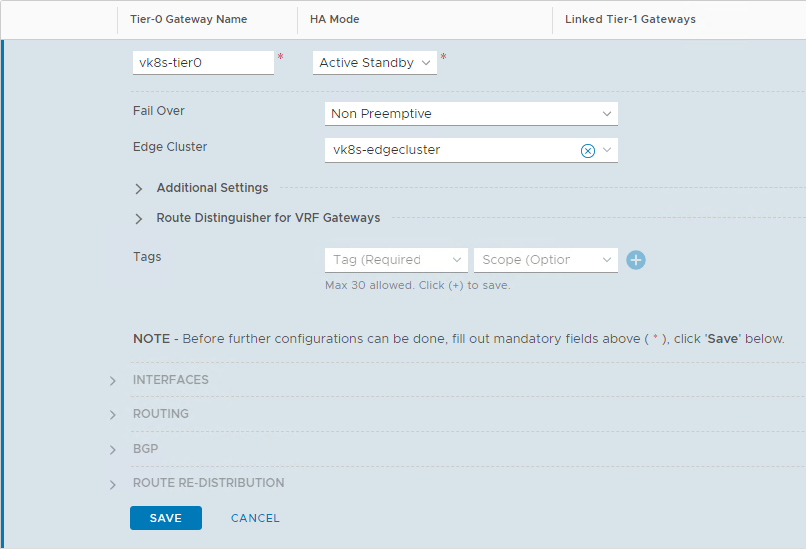
Create the Tier0 Gateway by navigating to Networking > Tier-0 Gateways > Add Gateway
- Specify a Name
- Set HA Mode to Active Standby
- Select your Edge Cluster
- Click Save and then Yes to continue configuring.
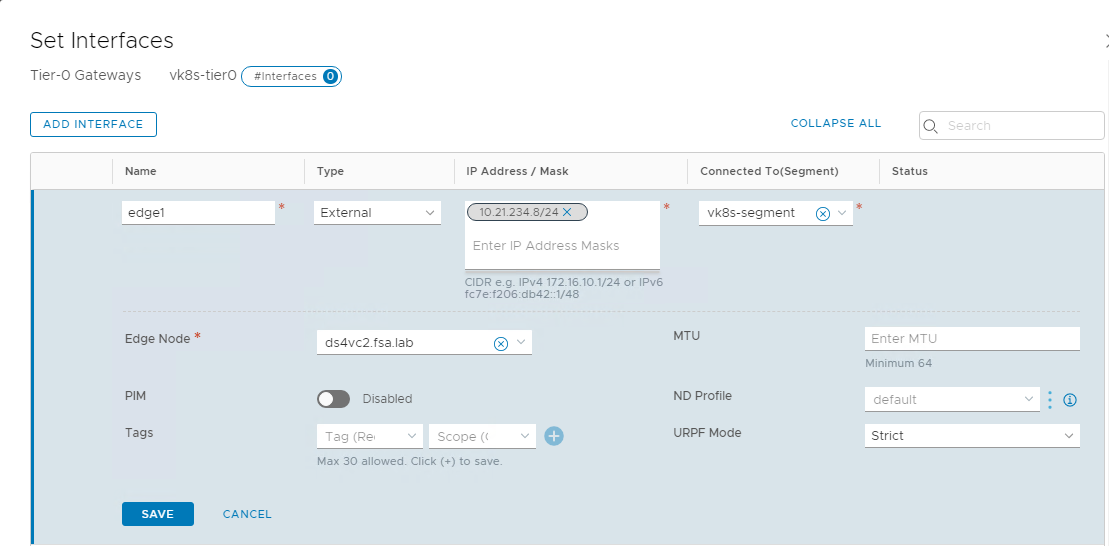
Under Interfaces configure an interface for each Edge.
- Specify a Name
- Set type to External
- Input IP in CIDR Format
- Select your Segment
- Select your Edge Node
- Click Save and Close
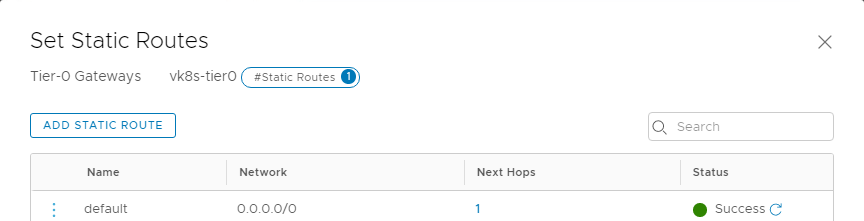
Under Routing configure a static route.
- Click Add Static Route
- Specify a Name (default)
- Specify a Network (0.0.0.0/0)
- Set Next Hop. This should be the gateway of your uplink interface created above.
Now should be your third test of network connectivity to make sure you can reach your edge uplinks. Validate you can ping the IP of the Interface you created above. If you cannot do NOT proceed and troubleshoot.
If your connectivity is working, we can now proceed!
Wrap Up
This post covered the Deployment and Configuration of NSX-T. Stay tuned for the next post in the series where we will cover enabling vSphere with Kubernetes.
comments powered by Disqus