- A Guide to Using iPXE + Pure Cloud Block Store for Stateless EC2 Instances - Part 2
A Guide to Using iPXE + Pure Cloud Block Store for Stateless EC2 Instances - Part 2
Welcome back to Part 2 of the Using iPXE + Pure Cloud Block Store (CBS) for Stateless EC2. In the first part of the series we covered getting all the details ready, Part 2 will dive deeper into the AWS and Pure Storage ecosystem to get an EC2 instance deployed running on an iSCSI SAN booted volume.
Prerequisites
- Python
- GitHub Reposistory for AWS Third Party Storage
- Deployed Cloud Block Store on AWS
- (Optional) Install Terraform
Recap
Previously we covered the basics of kicking off the process to get a stateless EC2. It included the following steps:
- Prerequisite Setup
- Building and Exporting the boot image
- Downloading boot image to our local machine
In Part 2 we will cover the remaining items which include:
- Create and mount a CBS volume to jump host
- Write boot image to be used as a template
- Deploy Stateless EC2 with boot volumes on CBS.
Now that we have all this out of the way, lets begin!
Prepare jump host and Write Boot Image
In order to write our image, we first need to mount a volume to our jump host. My linux machine is running as an EC2 instance in the same VPC so this will be quite easy.
This process will include two steps.
- Create a Host and Volume on Pure CBS Array
- Configure Linux iSCSI to connect and mount the volume
If iSCSI and multipath have not yet been installed on your jump host it can be installed via the local package management
1yum -y install iscsi-initiator-utils device-mapper-multipath
Check if a valid IQN has been assigned, if not create one and restart the iSCSI Service

Next, we will need to create the host object on our Pure Cloud Block Store. You can use the UI or CLI for this task, for simplicity we will do these tasks via the CLI.
To begin, SSH to the management VIP of your CBS Appliance. Using the following command you will create the host object using the IQN that was gathered above.
1purehost create --iqnlist iqn.1994-05.com.amazon:i-02bf0d3e31cefdcf5 jumphost1

We will need to give the volume a name and size, when the image was converted in Part 1–the size of the image should be listed in the S3 path you uploaded the image to.
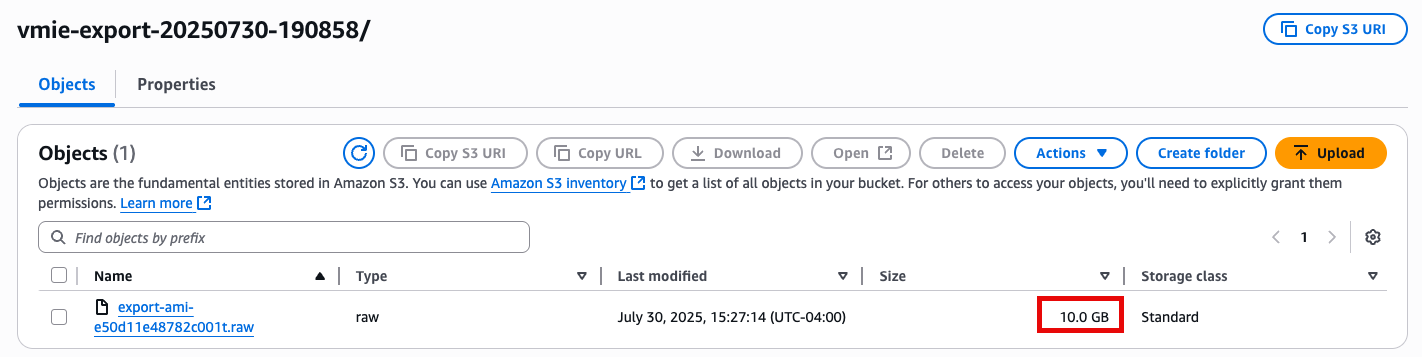
Create the volume using the size parameter from above.
1purevol create --size 10G jumphost1-data

Connect the volume to the host object using the following command.
1purehost connect --vol jumphost1-data jumphost1

Now that the jump host is prepped and the volumes mapped we can proceed to configure iSCSI on our jump host. The following script can be used to configure iSCSI and map it inside the guest OS.
 1#!/bin/bash
 2
 3# Set the IP addresses and initiator name here.
 4ISCSI_TARGET_IP1="172.18.10.68"
 5ISCSI_TARGET_IP2="172.18.10.92"
 6
 7# Discover and log in to iSCSI targets
 8iscsiadm -m discovery -t st -p ${ISCSI_TARGET_IP1}:3260
 9iscsiadm -m node -p ${ISCSI_TARGET_IP2} --login
10iscsiadm -m node -p ${ISCSI_TARGET_IP1} --login
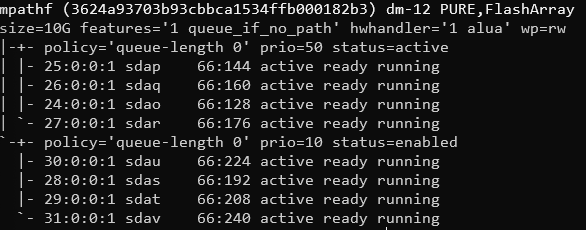
Gather the path to the volume, as we are using multipath we can list the volumes using the following command.
1sudo multipath -ll
Since the volume size was 10GB, lets look for this in the output. In this case it is mpathf
Now that we have the volume connected to our jump host, use dd to write the RAW image we had downloaded previously.
1sudo dd if=<pathtoraw> of=/dev/mapper/<diskpath> bs=8M status=progress oflag=sync

Once the image has been successfully written to our volume, we will un map and disconnect our volume. We will also copy to a new volume as a gold image and then take a snapshot in case we need to ever revert back to its original state.
1purehost disconnect --vol jumphost1-data jumphost1
2purevol copy jumphost1-data ubuntu24-goldtemplate
3purevol snap --suffix v1 ubuntu24-goldtemplate

We are now ready to create a new EC2 using our Ubuntu image!
Create your Stateless EC2 Instance
Let’s get ready to deploy our first EC2. This can be accomplished via the AWS Console or Terraform and includes 2 simple steps.
- Pure Storage - Create the Host object, clone the template volume and map it to the host object.
- AWS - Deploy an iPXE Based AMI and use the user data to configure iPXE boot to our image
Create Pure Storage Resources
Create the host object, volume and connect them. Make sure to connect the volume as lun1 (lun0 is reserved and cannot be used)
1purehost create ubuntu1 --iqnlist iqn.2010-04.org.ipxe:ubuntu1
2purevol copy ubuntu24-goldtemplate ubuntu1-boot
3purehost connect --lun 1 --vol ubuntu1-boot ubuntu1
In order to iSCSI sanboot we need to gather 2 items from the CBS array. The first is the array IQN, the second are the iSCSI interface IPs.
1pureport list
2purenetwork eth list
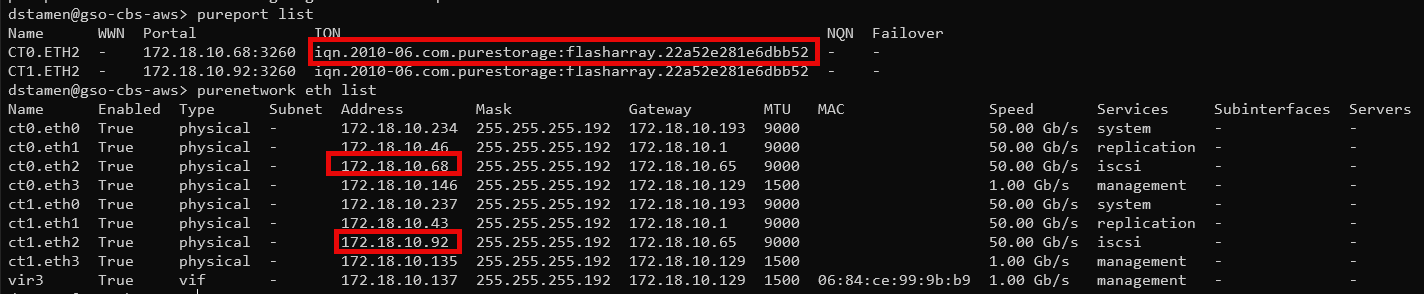
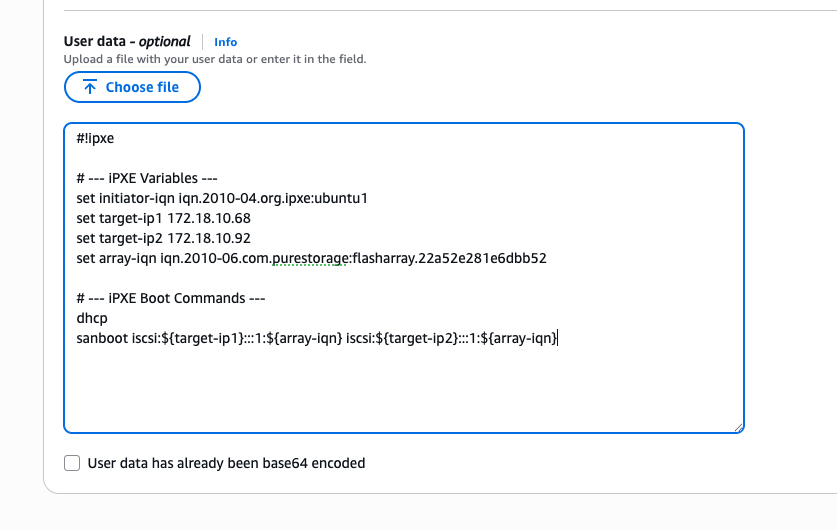
Using the outputs from above, let’s construct a user data file we will use to bootstrap our EC2.
 1#!ipxe
 2
 3# --- iPXE Variables ---
 4set initiator-iqn iqn.2010-04.org.ipxe:ubuntu1
 5set target-ip1 172.18.10.68
 6set target-ip2 172.18.10.92
 7set array-iqn iqn.2010-06.com.purestorage:flasharray.22a52e281e6dbb52
 8
 9# --- iPXE Boot Commands ---
10dhcp
11sanboot iscsi:${target-ip1}:::1:${array-iqn} iscsi:${target-ip2}:::1:${array-iqn}
We are now ready to deploy our EC2 Instance.
Create EC2 Instance
We will cover the deployment of the EC2 instance two ways, one using the AWS Console and one with Terraform. In order to deploy the instance, we need to use the iPXE AMI. You can use the following site to find the iPXE AMI id to use.
Amazon Web Services Console
Since I am using us-west-2 as a region I will use the following AMI to launch an EC2 instance. You will need to provide a name, an instance type, Key pair and network configuration. Make sure to select an appropriate VPC, Subnet and Security Group that allows access to your CBS array.
NOTE:
You can leave the default EBS size as 1 GiB as this drive will not be used.
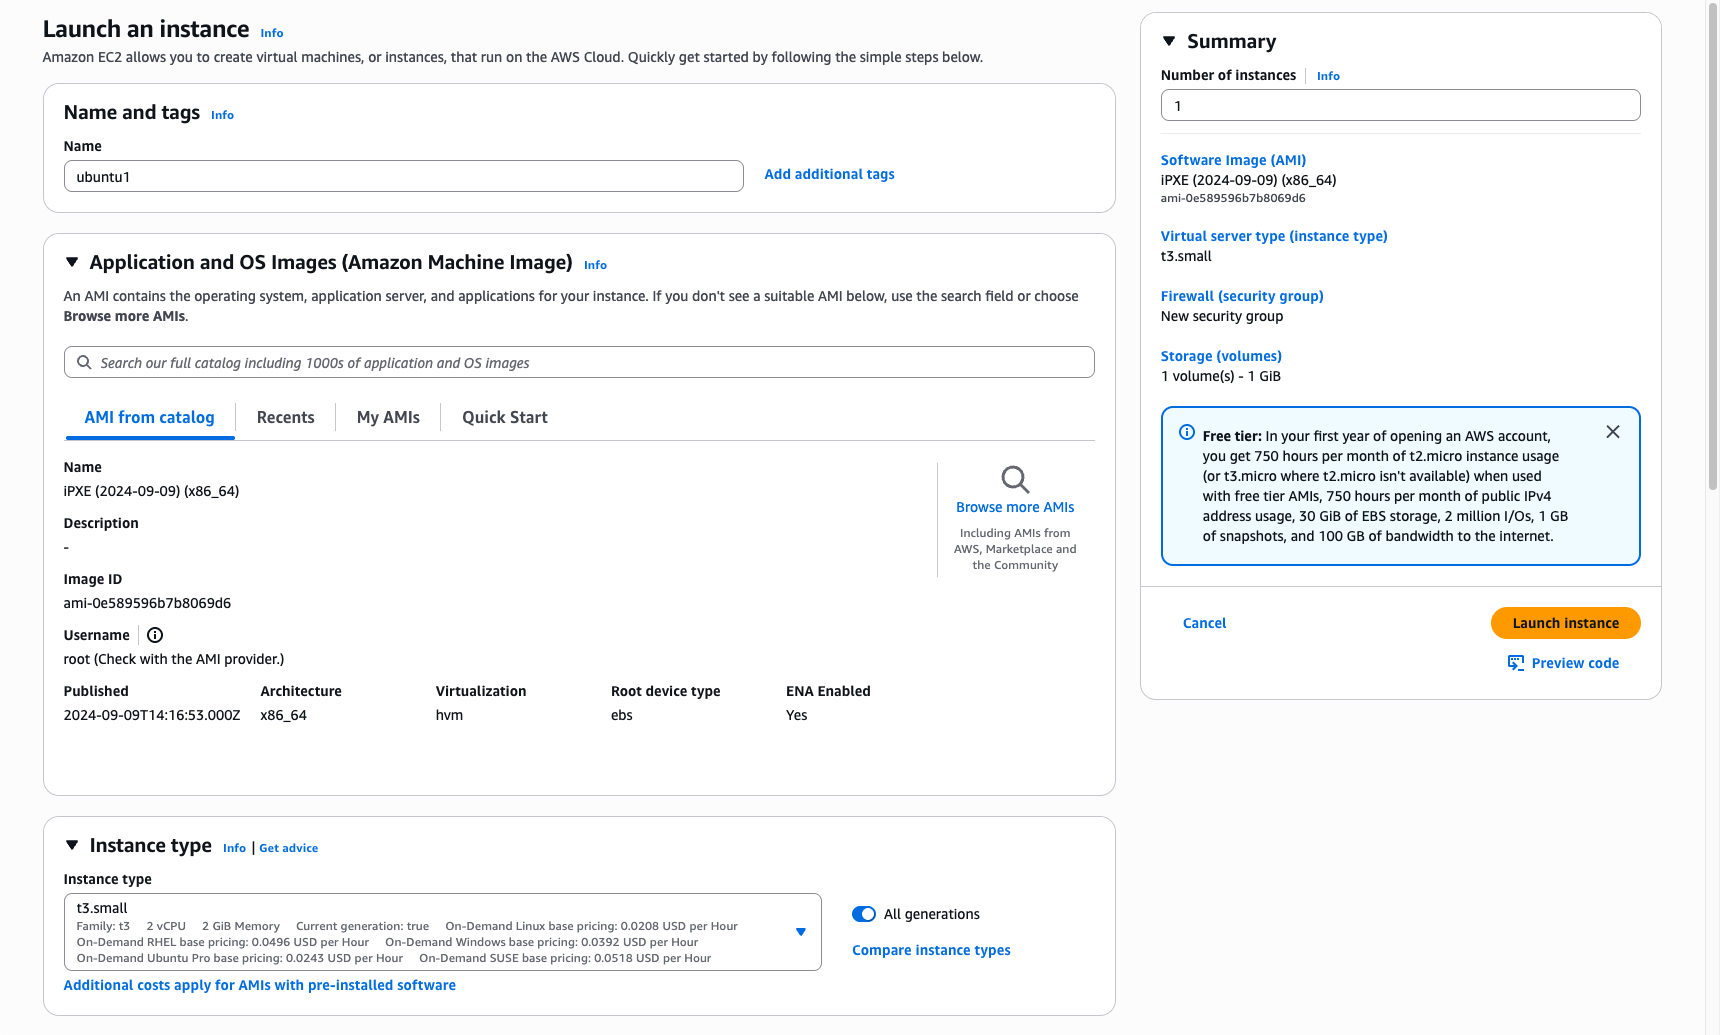
Do not forget to navigate to the advanced section and make sure to add your user data script.
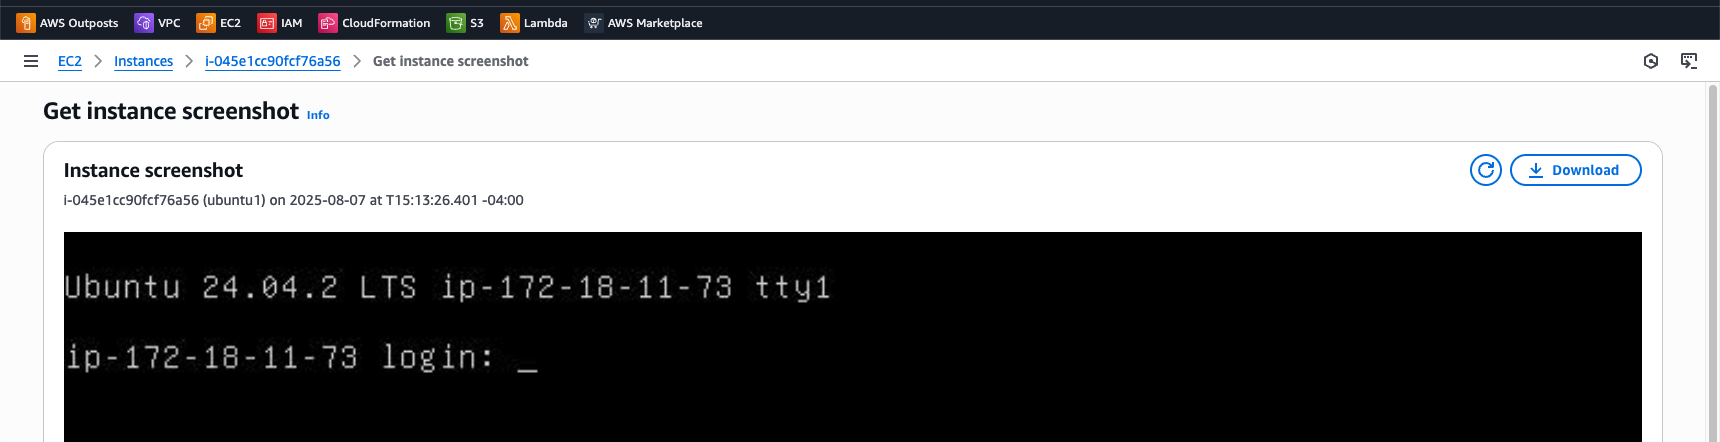
When your parameters are complete, you can now launch your instance. If needed, you can use console to code and get a CLI command to use in the future. To check the progress of your instance booting, navigate to Actions -> Monitor and troubleshoot -> Get instance screenshot.
If everything was configured appropriately you should see a successful boot of your EC2 instance.
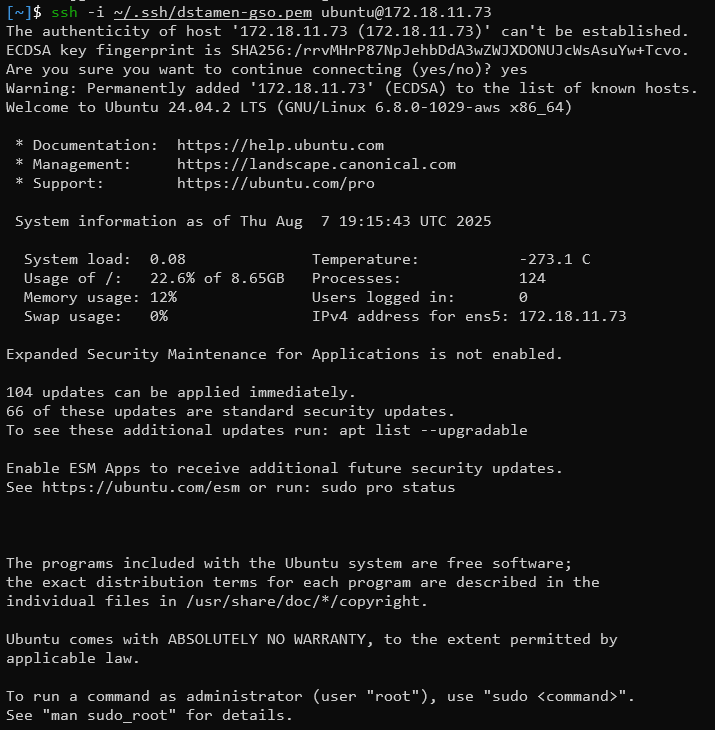
You can now ssh into your instance using the key pair you provided during the deployment.
Terraform
Terraform is a great way to automate deployments, see below for a sample file that will deploy the EC2 instance. It will pull the user data from a local file so make sure to save it in the same directory as userdata.sh.
Below are examples you can download and test in your own environment.
Once you run terraform apply your machine will be deployed!
Conclusion
Building and deploying a stateless EC2 is not that difficult once you have the prerequisites out of the way. Following a simple set of steps gives you a streamlined process, when using automation it makes it even easier and repeatable!
In the next part of this series, we’ll dive into a bit more advanced automation such as the creation of the Pure Storage objects, creation of a customized AMI and additional complex user data that will also mount additional data volumes inside our guest.
If you have questions or feedback, feel free to leave a comment below!
comments powered by DisqusSee Also
- A Guide to Using iPXE + Pure Cloud Block Store for Stateless EC2 Instances - Part 1
- Deploying a Linux EC2 Instance with Hashicorp Terraform and Vault to AWS and Connect to Pure Cloud Block Store
- Deploying a EC2 Instance with PowerShell to AWS
- Deploying a Windows EC2 Instance with Hashicorp Terraform and Vault to AWS
- Using CloudFormation to Manage EC2 in AWS